Provisioning Phones
- Always factory reset your phone before trying to auto provision it.
- Ensure your device is running a current firmware version.
- Devices with old firmware may not provision or function properly.
GrandStream
- Find IP for the Device
- Plug in an analog phone to the phone port.
- Press the button on the top of the ata.
- dial "02" to hear the current IP address played for you.
- Access the Web UI of the phone using the IP address found in the previous step. Default Login/Password is "admin"/"admin"
- If the Web UI is only asking for a password then it will either be "admin" or "123"
- Navigate to Advanced Settings page and scroll down until you get to the "Firmware Upgrade and Provisioning" section.
- Change the "Config Server Path" to Match the following picture, using the syntax auto.simplelogin.net/cfg and selecting the http radio button.

*Notes:
- If you were not able to find "Config Server Path" on the phone's Web UI then provisioning must be done on the phone itself.
- To do this; navigate on the phone, to Menu > Config > Upgrade > Config Server
- Once there enter the server address for your Endpoints Module in this format: auto.simplelogin.net/cfg
- Hit ok, then you will be prompted to do a reboot.
Cisco
NOTE: For CISCO SPA ATA's and phones follow the Linksys Settings.
You have to set this via the phone
- Press the Settings button
- Unlock the phone
- Early models, you can press "**#" and see the lock open up
- Newer models unlock by scrolling to the bottom of the settings menu and clicking on "Unlock phone", default password is "cisco"
- Navigate Network Configuration
- TFTP Server", change to "yes"
- Enter the IP of the Endpoints Module. NOTE: Cisco does not support any letters so be sure to enter the IP address using numbers only.
- Save and Exit
Linksys
- Find the IP address for the Device
- Linksys Phone (941,942,etc)
- Press the Setup button. Navigate down to Network.
- Look for Current IP.
- Linksys ATA or router(SPA112, SPA122, PAP2T, SPA2102,etc)
- Plug in an analog phone to the phone port.
- Press "****" to access menu
- Dial "110#" to hear the current IP address played for you.
- Linksys Phone (941,942,etc)
- Access the Web UI of the phone using the IP address found in the previous step
- Navigate to Admin --> Advanced page and Click on the Provisioning tab.
- Change the Profile Rule to Match the following picture, using the syntax http://auto.simplelogin.net/cfg/spa$MA.cfg
![]()
Polycom
NOTE: For SoundPoint/IP series phones must be at this version to work:
UC Software Version 4.0.14.1580
BootROM Software Version 5.0.14.0580
UC4 firmware allows for setting the provisioning URL via the web, otherwise, you can do it from the phone.
UC4 Web Interface
- Get the phone IP from Menu -> (Settings) -> Status -> Network -> TCP/IP Parameters
- Open a web browser to the IP you found and log in as username Polycom with password 456
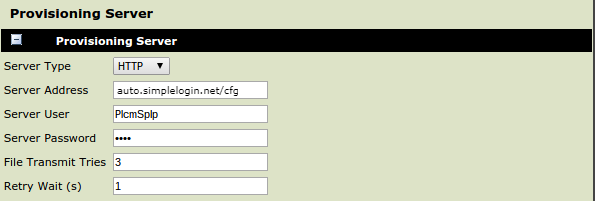
- Go to Settings -> Provisioning Server
- Set the Server Type to HTTP and Server Address to auto.simplelogin.net/cfg
- NOTE FOR POLYCOM D230 MODEL use:
- Polycom D230 : http://auto.simplelogin.net/cfg/cfg$mac.cfg
Phone Menu
- Press the Menu button, navigate to Settings then Advanced
- Type in the password, default is "456"
- Navigate to Admin Settings then Network Configuration then Server menu
- Change "Server Type" to HTTP
- Enter the "Server Address" to auto.simplelogin.net/cfg
- Exit and Save, the phone should reboot
Yealink
Depending on the firmware and model your device, its interface may look like either of the options below.
Option 1
- Determine the IP of the Phone and navigate to the IP via a browser.
- The default username/password is admin/admin
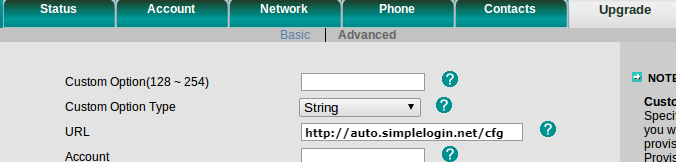
- Navigate to the "Upgrade" and to the "Advanced" sub-tab.
- In the URL field enter http://auto.simplelogin.net/cfg/
- Also, confirm that the "Check New Config" is set to "power on"
- Hit "Confirm" to save and configure the phone.
![]()
Option 2.
- Determine the IP of the Phone and navigate to the IP via a browser.
- The default username/password is admin/admin.
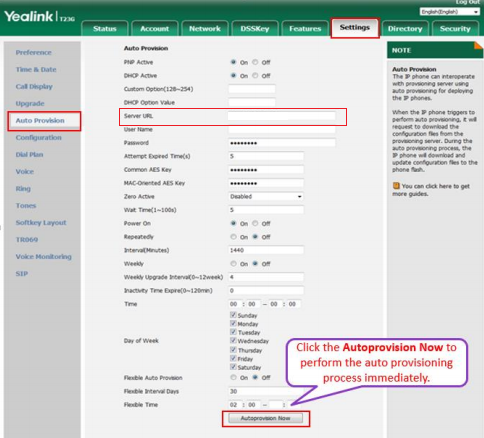
- Navigate to the "Settings" tab and to the "Auto Provisioning" sub-tab.
- In the URL field enter http://auto.simplelogin.net/cfg/
- Also, confirm that the "Power On" is checked.
- Hit "Auto Provision Now" to save and configure the phone.
Panasonic
Phone Menu:
- Turn on the Phone’s Web Interface by doing the following.
- Go the device Menu > IP Service > Network Settings > Embedded Web
- In this window Select the option for on and click Save.
- Then obtain the IP from the device.
- Go the device Menu > IP Service > Network Settings > IP Settings
Web Interface
- Navigate to IP of device through Web Browser.
- When prompted for Username and Password use the following:
- Username: admin
- Password: adminpass
- Then Navigate to the Maintenance > Provisioning Maintenance
- In the Standard File URL field enter: http://auto.simplelogin.net/cfg/{mac}.cfg
- Note: Replace {mac} with the MAC address of the device.
- Click Save

Vtech
- Get the phone IP from Menu > Status > Network
- Open a web browser to the IP you found and log in using the following:
- Username: admin
- Password: admin
- Go to Servicing > Provisioning
- In the Provisioning Server field enter http://auto.simplelogin.net/cfg
- Click Save and Reboot device

Fanvil
Note: For X Series Enterprise IP Phones, the minimum Software Version is 1.6.1
Auto provisioning for this device only allows Basic Registration
- Determine the IP of the Phone by going to Menu > Status.
- Open a web browser to the IP you found and log in using the following:
- Username: admin
- Password: admin
- Navigate to Auto Provision
- Click on Static Provisioning Server
- In the Server Address field enter: http://auto.simplelogin.net/cfg
- Change “Protocol Type” to HTTP
- Change “Update Mode” to Update After Reboot
- Click Apply and reboot the device

Snom
- Get the phone IP from Menu > Information > System Information
- Open a web browser to the IP you found
- Go to Advanced > Update
- In the Server URL field enter http://auto.simplelogin.net/cfg/{mac}
- Click Apply and Reboot device

Avaya
Phone Menu:
- From the phone go to Admin button
- Enter password 27238
- Scroll to Web Server and Enable
- Click Save and Back
*Phone will reboot - Get the phone IP from IP Configuration > Ethernet IPv4
- Open a web browser to the IP you found
- Enter the following information to login:
Username: admin
Password: 27238 - Go to Management > HTTPS Provisioning Server
- Enter the following information:
HTTPS Server Address: auto.simplelogin.net
HTTPS Server Directory Path: cfg - Click Save and Restart device

Related Articles
Provisioning Phones & SNAPMobile
The Phones page allows you to manage your phones. To display the Phones page, click the Phones icon at the top of the page: Each row shows a phone that has been added to the system, along with: · Whether the phone is registered. · The phone name and ...Handling Calls (Transfer, Conference, Call Park)
Your cloud PBX features various ways to move calls around, including attended transfer, unattended (blind) transfer, voicemail transfer, park, and more. In this section, references to BLFs are the 1-touch buttons to extensions common at front-desk ...Making Calls
Making a call with your phone does not require a leading 9. You can dial on-hook or off-hook. Ø To dial on-hook 1. Dial the phone number. 2. Pick up the handset, headset, or speaker. To dial off-hook 1. Pick up the handset, headset, or speaker. 2. ...Manually Provision ATA
Portal Steps: Login https://dctechitllc.simplelogin.net Hosted PBX Users Select User Phones Tax Add Phone Select Model Select Server Enter Mac Address Line: 1 Save Find IP Address of ATA: 1. Call *** 2. Enter 02 Take note of IP Address Setup Phone ...Using the Home Page & Intro to Voicemail (Tips & Tricks)
Home The Home page of your portal provides an at-a-glance view of everything going on with your extension. Table 2‑1 describes the areas on the Home page. Field Description New Messages Shows new messages. You can play messages, click to call back, ...